
Angular Markdown Editor: A Guide to AI-Ready Integration
Learn how to integrate an Angular Markdown editor into your app. This step-by-step guide covers setup, autosave, and preparing content for LLM workflows.
You probably started with a <textarea>, added a preview pane, and got something working fast. Then more demanding requirements showed up. Users wanted formatting buttons. Product wanted live preview. Security wanted sanitization. The AI team wanted output that could feed retrieval, chunking, and grounding without turning every document into noisy HTML.
That's where most Angular markdown editor guides stop too early. They show rendering, maybe syntax highlighting, and call it done. In production, the editor is only one part of the pipeline. What matters is what leaves the editor: clean Markdown, predictable structure, safe rendering, and a path for scanned or photographed documents that never started as text in the first place.
A good Angular Markdown Editor should help authors write comfortably while still producing content your application can trust. If your app touches knowledge bases, legal docs, support content, internal SOPs, or AI-assisted search, that distinction matters more than the toolbar buttons.
Why Your Angular App Needs a Modern Markdown Editor
A plain textarea is fine until users need structure. A classic WYSIWYG is fine until your database fills with awkward HTML, inline styles, and content that's hard to diff, hard to validate, and harder to reuse outside the browser.
The gap between writing and usable content
Angular teams usually hit the same fork in the road. They either keep the authoring experience simple and make users learn Markdown syntax on their own, or they add a rich editor and accept noisy output. The better option is a Markdown-first workflow with a visual layer on top.
That matters even more if your application feeds search, summarization, assistants, or retrieval pipelines. Existing content about Angular markdown editors overwhelmingly focuses on rendering Markdown as HTML and misses the harder problem of preserving document structure for LLM use. The same discussion also notes that 70% of token costs in LLM workflows stem from unstructured document uploads in this business context, which is exactly why storage format and document shape matter before inference even starts, as discussed in this Angular markdown editor gap analysis.
Practical rule: If your content may later be chunked, embedded, or cited by an LLM, treat the editor as the first stage of data engineering, not just a UI widget.
A hybrid writing experience solves a real usability problem too. Engineers often want raw Markdown. Operations, legal, support, and product teams usually want buttons, preview, and guardrails. A good editor bridges both without forcing HTML into the center of the workflow. If you're comparing interface styles before choosing a component, this overview of a WYSIWYG Markdown editor trade-off is a useful frame.
Why Markdown fits AI workflows better than messy rich text
Markdown gives you plain text with structure. Headings, lists, tables, blockquotes, code fences, and links stay readable to people and parsable by systems. That's the key advantage.
For AI use cases, clean Markdown helps with:
- Chunk boundaries: Heading levels become natural split points.
- Stable anchors: Repeated section names and normalized formatting make retrieval less brittle.
- Lower cleanup cost: You spend less time stripping editor-specific markup before indexing.
- Reviewability: Developers can inspect stored content without decoding large HTML blobs.
What doesn't work well is pretending rendered HTML is the canonical source. HTML is presentation. Markdown is content plus lightweight structure. In Angular apps that need both a pleasant editing experience and downstream machine use, that difference ends up shaping the whole architecture.
Choosing and Installing Your Angular Editor
The fastest way to get stuck is to pick an editor that looks nice in a demo and turns into a configuration project once you add preview, toolbar behavior, and storage conventions.

Why ghiscoding is the practical default
For Angular specifically, ghiscoding/angular-markdown-editor is a strong default because it's designed as an all in one WYSIWYG Markdown editor bundled into a single Angular Component, with preview built in, which reduces integration complexity according to the project repository.
That design choice matters. Some Angular editor packages are intentionally minimal. They're useful if you want a thin wrapper and plan to compose everything else yourself. In real projects, though, teams often want one component that handles authoring and preview without stitching together multiple loosely related widgets.
A few selection criteria usually separate the practical options from the frustrating ones:
| Criterion | What to prefer | What causes trouble |
|---|---|---|
| Integration model | Angular-native component | Generic JS wrapper with Angular hacks |
| Preview support | Built in or cleanly paired | Separate preview state you have to maintain |
| Output format | Markdown as the source of truth | HTML-first editing with Markdown export as an afterthought |
| Toolbar behavior | Configurable and predictable | Hard-coded controls that don't match your schema |
| Maintenance fit | Clear docs and active repo history | Sparse docs and outdated Angular assumptions |
If you want a broader comparison mindset before committing, review a few JavaScript Markdown editor patterns. The trade-offs there map cleanly to Angular too.
Basic installation flow
The first milestone is simple. Get the editor mounted, bind it to a string, and prove the content round-trips.
A typical install flow looks like this:
- Add the package to your Angular project with your package manager.
- Import the required module in the feature module or app module.
- Bind editor content to a component property.
- Start with local state first, not autosave or API persistence.
- Confirm preview behavior before adding custom toolbar logic.
That order prevents a common mistake: trying to build persistence, sanitation, and custom rendering before the base component is stable.
A minimal Angular setup
The exact module names depend on the package version you install, but the shape should stay familiar:
import { Component } from '@angular/core';

@Component({
  selector: 'app-doc-editor',
  template: `
    <angular-markdown-editor
      [(ngModel)]="content">
    </angular-markdown-editor>
  `
})
export class DocEditorComponent {
  content = `# Release Notes

- Added editor
- Added preview
- Preparing output for AI pipelines
`;
}
If you prefer reactive forms, bind the editor to a FormControl instead of ngModel. In teams with validation rules, reactive forms usually age better because you can layer in schema checks, dirty-state handling, and save guards without rewriting the component later.
Start with Markdown as the persisted value. Don't store rendered HTML unless you have a separate presentation reason.
Once the editor is visible and content updates correctly, you're ready to make it useful instead of merely present.
Implementing Core Features and Event Handling
The default editor demo isn't what users judge. They judge whether typing feels responsive, whether preview matches expectations, and whether the app loses their work.
What users actually expect
Individuals need the same core set of behavior:
- A usable toolbar with headings, bold, italics, links, lists, blockquotes, and code blocks.
- A preview mode that doesn't drift from the stored Markdown.
- Initial content loading from an API or local draft.
- Fast event handling so typing doesn't lag.
- Autosave that's quiet and reliable.
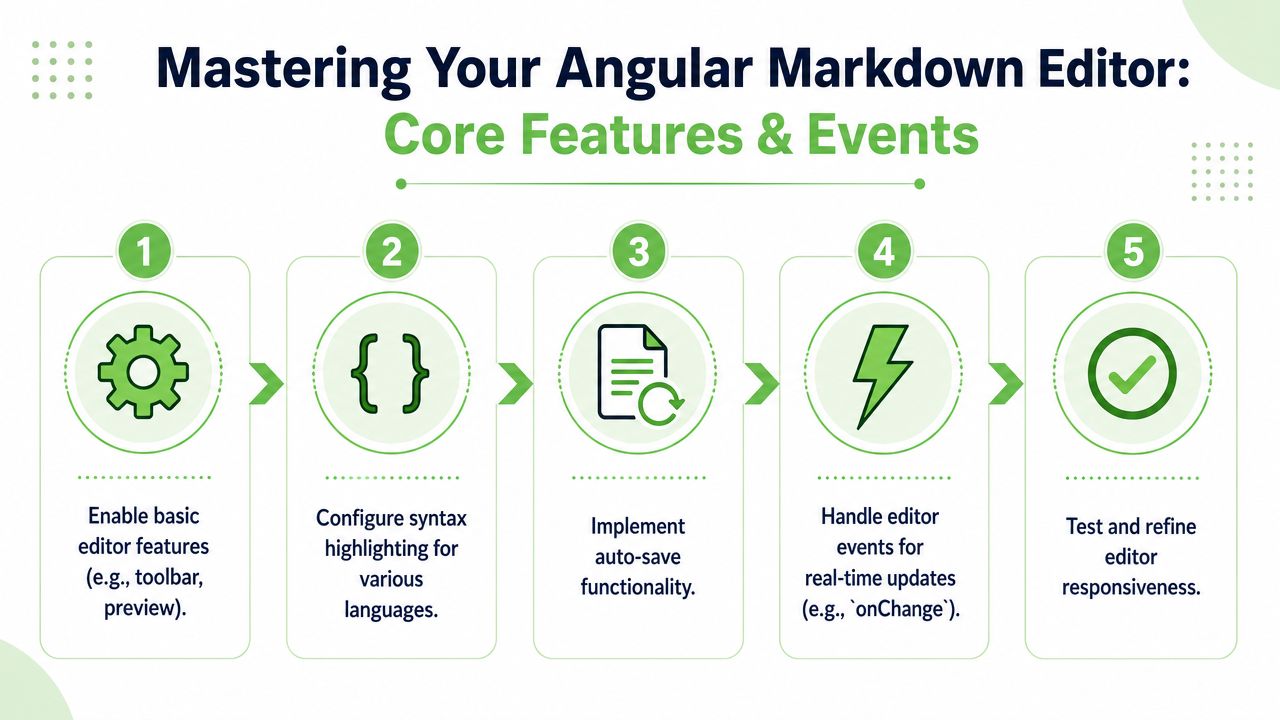
The implementation details vary, but the pattern is stable: keep one canonical Markdown string in component state, render from that, and debounce anything expensive.
A simple reactive-forms setup might look like this:
import { Component, OnInit, OnDestroy } from '@angular/core';
import { FormControl } from '@angular/forms';
import { Subject } from 'rxjs';
import { debounceTime, distinctUntilChanged, takeUntil } from 'rxjs/operators';

@Component({
  selector: 'app-editor-shell',
  template: `
    <angular-markdown-editor [formControl]="markdownControl"></angular-markdown-editor>
    <p *ngIf="saveState">{{ saveState }}</p>
  `
})
export class EditorShellComponent implements OnInit, OnDestroy {
  markdownControl = new FormControl('# Draft\n\nStart writing...');
  saveState = '';
  private destroy$ = new Subject<void>();

  ngOnInit(): void {
    this.markdownControl.valueChanges
      .pipe(
        debounceTime(800),
        distinctUntilChanged(),
        takeUntil(this.destroy$)
      )
      .subscribe(value => {
        this.saveDraft(value || '');
      });
  }

  saveDraft(markdown: string): void {
    this.saveState = 'Saving...';
    localStorage.setItem('draft-markdown', markdown);
    this.saveState = 'Saved';
  }

  ngOnDestroy(): void {
    this.destroy$.next();
    this.destroy$.complete();
  }
}
That won't win awards, but it solves the practical problem. The debounce prevents saves on every keystroke, and the editor remains responsive.
Capturing changes without hammering your backend
Autosave often fails for organizational reasons, not technical ones. Teams wire the editor directly to an API call, then wonder why typing feels heavy or the network tab never stops moving.
A safer pattern is:
- Capture locally first: update component state immediately.
- Debounce persistence: save after the user pauses.
- Track dirty state: avoid duplicate writes.
- Handle offline or transient failures: queue retries or keep the latest local draft.
If your save API also computes embeddings, summaries, or change logs, separate those jobs from typing events. Editing should stay cheap. Expensive downstream work belongs in a later pipeline stage.
Here's a useful demo of event-oriented editor wiring before you start polishing your own implementation:
Rendering support and common failure points
For rendering and enhanced preview, many Angular stacks still lean on marked for parsing and CodeMirror for highlighting, often wrapped through ngx-markdown. The package documentation also calls out a common pitfall: if you don't configure angular.json to include assets, local Markdown files can fail with 404 errors, as described in the ngx-markdown package notes.
That usually shows up in three places:
- Local
.mdfiles won't load because the assets path isn't included. - Highlighting looks broken because the CSS for your highlighter never shipped.
- Preview behaves oddly because your HTTP client didn't request the file as text.
If you fetch Markdown files directly, request them as text:
this.http.get('/assets/docs/readme.md', { responseType: 'text' })
  .subscribe(markdown => {
    this.markdownControl.setValue(markdown);
  });
Angular will otherwise try to be clever about parsing, and that's not what you want for raw Markdown.
Keep the render stack boring. Markdown in, HTML preview out, one path for parsing, one path for sanitizing.
Sanitizing and Structuring Markdown for AI Pipelines
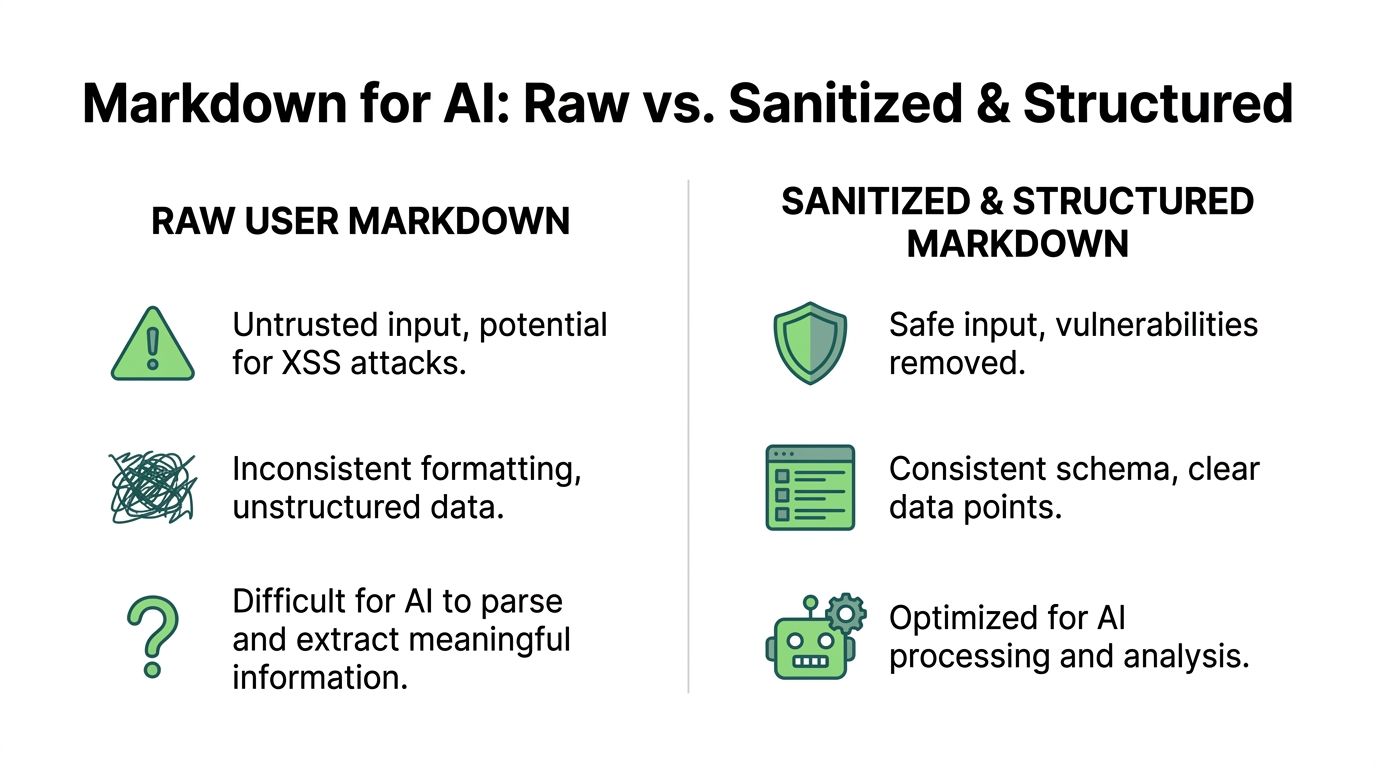
Sanitization often occurs only at render time. That's necessary, but it's not sufficient if the same content also feeds search indexes, assistants, export jobs, and review workflows.
Sanitize before rendering and before storage decisions
Markdown feels safer than raw HTML, but user-authored Markdown can still introduce risky output once it's rendered. Links, embedded HTML, copied content from rich-text apps, and malformed markup all deserve scrutiny.
In Angular apps, a practical approach is:
- Store the raw Markdown as the canonical authoring format.
- Render through a known parser.
- Sanitize the rendered HTML with a library such as DOMPurify before display.
- Apply content rules on the Markdown itself when you care about downstream AI shape.
That separation helps. Sanitization protects the browser. Structural validation protects your retrieval pipeline.
A basic rendering flow might look like this:
import { marked } from 'marked';
import DOMPurify from 'dompurify';

const rawMarkdown = formValue;
const renderedHtml = marked.parse(rawMarkdown);
const safeHtml = DOMPurify.sanitize(renderedHtml);
Structure beats decoration for retrieval
The Markdown that works best for AI isn't the fanciest Markdown. It's the most predictable.
That means favoring:
- Consistent heading depth so sections nest cleanly.
- Short paragraphs instead of huge pasted blocks.
- Real lists instead of manually typed bullets.
- Plain tables with stable column names.
- Explicit labels such as
Status,Owner,Effective date, orSource.
What hurts retrieval is the opposite. Random heading jumps, decorative punctuation, pseudo-tables made of spaces, and copied fragments from Word all make chunking noisier.
If two people can write the same kind of document in visibly different structures, your retriever will feel that inconsistency long before users do.
Accessibility work helps here too. If your editorial workflow includes images, authors should add meaningful alt text while they write, not as an afterthought. A lightweight tool such as this alt text generator can help teams produce better image descriptions before those assets get indexed alongside the Markdown.
A practical schema for AI ready Markdown
You don't need a heavy spec. You do need rules.
A lightweight house style for AI-ready Markdown can be as simple as this:
| Element | Rule | Why it helps |
|---|---|---|
| Title | One # heading only |
Gives the document a stable root |
| Sections | Use ## for primary sections |
Makes chunking predictable |
| Subsections | Use ### only when needed |
Prevents deep, noisy nesting |
| Lists | Use real Markdown lists | Easier parsing and extraction |
| Tables | Keep headers explicit | Better field mapping later |
| Notes | Use blockquotes sparingly | Preserves emphasis without clutter |
You can also prepend optional metadata in a compact block, for example source name, review status, and document type. Keep it restrained. The goal is to make retrieval better, not to wrap every file in ceremony.
Token-efficient Markdown usually comes from subtraction. Remove duplicated headings, decorative separators, pasted tracking junk, and HTML remnants. Keep the text that supports meaning and retrieval. Drop the rest.
Integrating with an OCR and Conversion API
A lot of content doesn't begin as text. It arrives as a scanned contract, a photographed whiteboard, a low-quality PDF, or a phone snapshot of handwritten notes. A normal editor can't solve that intake problem on its own.
Where the standard editor workflow breaks
This is the missing piece in most Angular markdown editor tutorials. They assume the user starts with text. In enterprise workflows, that's often false.
There's documented demand for OCR-enabled document pipelines too. Existing Angular editor tutorials omit degraded scans and handwritten notes, even though 65% of enterprise AI teams prioritize OCR-enabled document pipelines in this business context, as noted in the ngx-markdown-editor discussion. That gap is exactly why teams end up building custom bridges around otherwise decent editors.
If your app handles compliance docs, intake packets, field reports, maintenance logs, or medical paperwork, the front end needs to support a two-stage workflow:
- Convert non-text documents into structured Markdown.
- Let a human review and fix the result in the editor.
A background read on OCR for scanned documents in AI workflows is helpful if this ingestion path is new to your team.
A workable ingestion pattern
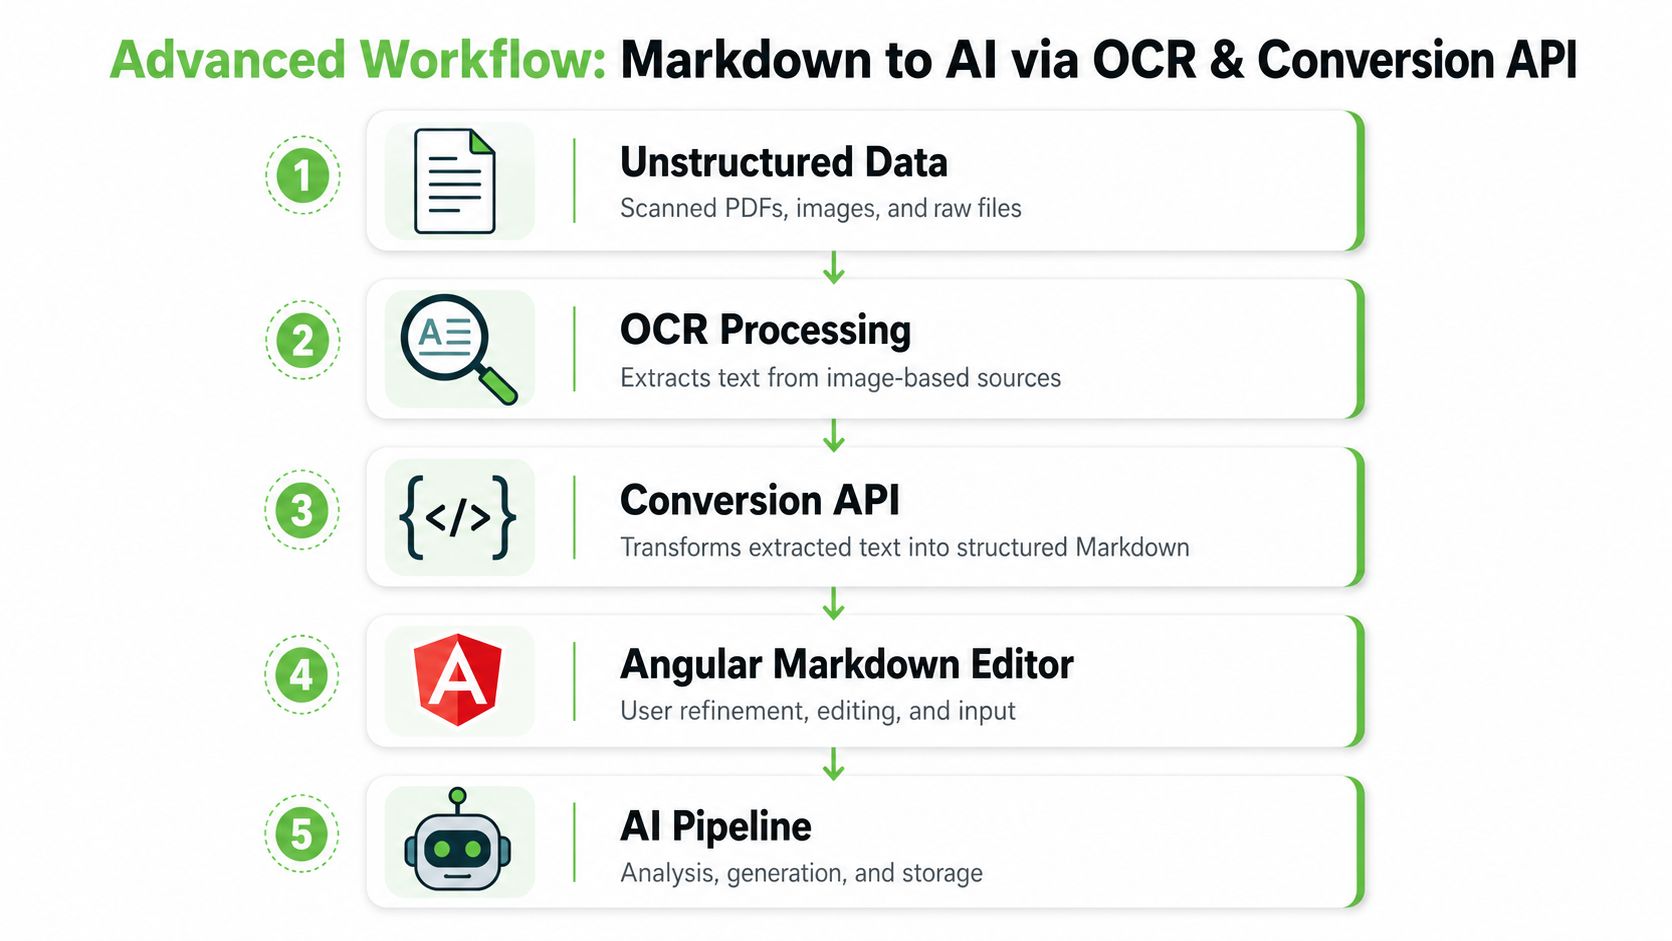
The cleanest implementation I've seen uses the Angular editor as the review surface, not the OCR engine.
The flow looks like this:
- User uploads a scan or image from the Angular app.
- Your backend sends the file to an OCR and conversion API.
- The API returns structured Markdown instead of plain extracted text.
- Angular loads that Markdown into the editor for human verification.
- The user corrects headings, tables, names, and edge cases before final save.
That gives you an important separation of concerns. OCR handles extraction. The editor handles review. Your application handles policy, provenance, and storage.
A simplified Angular service might look like this:
@Injectable({ providedIn: 'root' })
export class IntakeService {
  constructor(private http: HttpClient) {}

  uploadForConversion(file: File) {
    const formData = new FormData();
    formData.append('file', file);

    return this.http.post<{ markdown: string }>('/api/convert-scan', formData);
  }
}
And in the component:
onFileSelected(file: File): void {
  this.intakeService.uploadForConversion(file).subscribe(result => {
    this.markdownControl.setValue(result.markdown);
  });
}
The review step matters more than teams expect. OCR can extract text well and still flatten hierarchy. A human editor can quickly restore a missing heading, split merged paragraphs, or repair a malformed table in seconds.
Adding provenance before saving
For AI and audit-heavy use cases, the saved document should carry a little context about where it came from and whether a person reviewed it.
You don't need a complicated standard. A compact metadata block is enough:
# Inspection Report

Source file: plant-floor-scan-042.pdf
Ingestion method: OCR conversion
Review status: Human verified
Document type: Maintenance report
That metadata gives downstream systems something stable to attach to. Search can filter by review status. RAG pipelines can include source context. Internal users can distinguish a born-digital Markdown note from a document created through OCR and then corrected by staff.
What doesn't work is storing the OCR output blindly and treating it as final. The best workflow is conversion first, editorial review second, persistence third. That sequence keeps your Angular Markdown Editor useful instead of turning it into a passive text box after ingestion.
Performance, Security, and Final Troubleshooting
Production problems usually come from a few repeat offenders. Bundle weight, unsafe rendering, CSS collisions, and assumptions that looked harmless in local development.
A short production checklist
Use this as a final pass before shipping:
- Lazy-load the editor route: Keep your initial application shell small and load the heavy editor only where needed.
- Sanitize every rendered output: Even if authors are internal, copied content can carry unsafe markup once parsed.
- Store Markdown, not preview HTML: HTML is disposable output. Markdown is the durable source.
- Watch CSS scope carefully: Code blocks, tables, and blockquotes often inherit app-wide styles in ugly ways.
- Guard SSR paths: Some editor packages expect browser APIs and need conditional loading in server-rendered apps.
- Keep autosave separate from expensive processing: Don't tie typing to indexing, embeddings, or document analysis jobs.
If your team handles sensitive documents, editorial architecture and privacy policy should line up. This overview of File Studio's data privacy insights is a practical companion read when you're deciding what to retain, redact, or process externally.
One more trade-off is worth being honest about. A large, polished WYSIWYG experience can feel friendlier for non-technical users, but it often pushes you toward HTML-first storage and more rendering complexity. A focused Angular Markdown Editor asks a little more from the writing experience, yet it pays you back in portability, reviewability, and AI readiness.
If you need to go beyond editing and want scanned PDFs, images, web pages, and office documents converted into clean Markdown for retrieval workflows, Markdown Converters is worth a look. It's built for AI-ready output, supports OCR-heavy inputs, and fits well when your Angular editor is only one stage in a larger ingestion pipeline.
Related Articles
Batch PDF Conversion: A Practical Guide for 2026
Learn practical batch PDF conversion workflows, from simple UI uploads to automated API processing. Convert scanned PDFs with OCR and create AI-ready Markdown.
Read articleAdd a Django Markdown Editor: A Practical Guide
Learn how to add a powerful Django Markdown editor to your app. This practical guide covers installation, image uploads, security, and rendering for developers.
Read articleMD File Reader Online: Convert for AI & LLM Workflows
Unlock the power of our MD file reader online. Convert any document to clean, AI-ready Markdown for RAG & LLM workflows. More than just viewing!
Read article